Monday, 18 September 2023

Cape Ortegal - The Replay


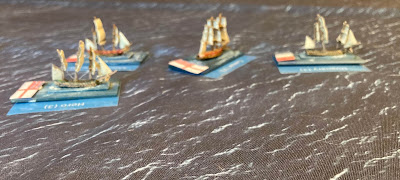
The setup for this game, including the ships involved, can be found here. This is my first major game in this genre, so apologies for the lack of nautical terminology.

The Wind in their Sails

British fleet started with the initiative, and Strachan decided to close the gap between the two fleets as rapidly as possible. With the wind in their sails, the British squadron made rapid pace towards the French fleet, although the Caesar at the fore of the British Line came under heavy fire and took substantial damage. 
Age of Sail


Unfortunately for Caesar, my novice interpretation of the partial broadside probably led to her sustaining more damage than necessary. However, be aware that these fighting gun platforms can absorb a lot before they begin to weaken.

Cutting the Line

However, as the British line approached, it swung to starboard at close range, and both fleets exchanged some devastating broadsides. After these exchanges, the honours were even. However, the British gained the first movement chit next turn, allowing them to cut the French line,  racking the Dugray and the Formidable. Both took heavy damage; the Dugray received a critical hit and lost her steering. Meanwhile, the Hero and Courage concentrated their fire on the Mont Blanc, which suffered heavy damage but remained actionable. After this divesting turn, the French fleet was in disarray. Dugray was sailing away from the action, and the Formidable's poor crew, an unlucky set-up throw, struggled to execute a turn to rejoin the Mont Blanc and the Scipion.

Cutting the Line


Dumanoir Strikes Back

By turn four, it looked like a British victory was assured, especially as the Namur had now come into the sight of the main action. However, the French were not defeated. A lucky broadside from the Formidable found its mark felling the Caesar's main sail, which collapsed onto the poop deck, injuring Strachen and the Caesars' senior officers. Strachan was forced to transfer the flag to Captain Gardner on the Hero.

This success against Caesar boosted French resolve, and the Formidable now managed to turn back onto the main action.  The plucky Scipion, which would prove to have the bravest crew on the day, continued to fight on regardless despite coming under heavy bombardment from the Hero and the Courageux. Finally, the two remaining French ships joined, enabling them to provide mutual support to each other.

The Weather Gods

Dumanoir le Pell now decided to isolate and destroy the Namur before she could join the main British squadron. Formidable and the Scipion sailed parallel to sandwich the Namur between their broadsides. However, the firepower of these ships had been diminished by the previous action, and minor damage was done. The Namur finally linked up with the Hero and the Courageux to form a new battle line that launched a vicious attack on the remaining French ships. The game has now turned into a series of fleeting exchanges as the ships passed between each other, and any kind of formation was now lost.

The advantage was now with the British, and it looked likely that the reenactment would create the historical outcome.  Again, when victory seemed inevitable, nature intervened. The wind turned more to the south, and on the next turn, the waters became choppy.  It appeared that the infamous lousy weather of the Bay of Biscay would have the last laugh because the conditions gave the French the chance to escape the clutches of the British warships. However, this proved to be a false hope. Another bombardment from the British ships forced the brave Scipion to strike its colours. Finally, the Namur and the Courageux caught up with the French flagship, forcing Admiral Dumanoir le Pelley to surrender.

The Final Moments


Some Thoughts

It was an enjoyable game with lots of twists and turns. As I am still learning the intricacies of KMH, mistakes were made, partial broadside and tacking being the two I spotted during the game. Also I think I will make two minor changes to the rules,
  1. A test  to break the line. It is, from my reading that this was a tricky manoeuvre.
  2. Introduce a call by the admiral to allow the ships to fight individually.  At what point in the game should you introduce ship cards/chits for individual ships and then squadron cards removed?   

Thursday, 14 September 2023

Battle of Cape Ortegal 1805.


This re-enactment is an early venture into Napoleonic naval warfare, using the Kiss Me Hardy (KMH) rules. My route to this battle and why I used the KMH rules can be found in my two previous blogs, Land Lubber and Age of Sail. This small battle is perfect for Kiss Me Hardy and solo play because of the few ships involved, although it can be played with two to four players. 

Age of Sail


Battle of Cape Ortegal, November 4th 1805

The Battle of Cape Ortegal, or Strachan's Action, was the final action of the Trafalgar campaign. It was fought between a squadron of the Royal Navy and a remnant of the fleet under Vice Admiral Dumanoir le Pelley that had escaped the Battle of Trafalgar. On 22 October, Dumanoir le Pelley sailed towards Rochefort. However, on entering the Bay of Biscay, he sighted the British frigate the Phoenix and gave chase. The Phoenix led Dumanoir’s to Starchan’s squadron. At this point, the commanders tried to gather their ships, although both suffered from slow-moving or damaged vessels. Strachan had to press on without the Bellona, and the Namur was probably foul-bottomed and was dragging behind the main line. For Dumanoir, most of his ships had sustained some damage at Trafalgar or in the following storms. The Scipion had difficulty keeping up with the main French formation and was harassed by the British frigates before the main action commenced.

The Battle 

The battle was reported in the Lloyds List on Tuesday, November 12 November,
The Formidable, of 80 guns, Dugay Trouin, Mont Blanc, Scipion, of 74 guns each, separated from the remains of the Combined Fleet. After the action of Cape Trafalgar, were taken the 4th Inst. of Rochefort, by the Squadron under the command of Sir Richard Strachan, consisting of The Caesar, Hero, Courageux, and Namur Men of War, Revolutionaire, Phoenix, Santa Margaritta, and Aoleus Frigates, after an Action of 3 hours and a half. The Enemy had 5 and 600 killed and wounded; our losses about 300 killed and 100 wounded. – The Caesar, Courageux, Hero and Revolutionaire arrived in Plymouth the 10th with prizes, which are all dismasted.

Refighting the Battle

Two options are available in setting up the game. 
  1. Ship of the Line Engagements. In most battles, the frigates played a limited role so that the battle could be played without the frigates. The skirmishing between the frigates and the Scipion can be built into the Scipion profile to reflect the damage the ship had sustained. The advantage of this approach is that there are fewer ships to handle for solo play.
  2. Including the Frigates. The British frigates played a part in Strachan’s plans. Besides harassing the Scipion, they would later swing around the rear of the French squadron, forming a secondary line.
The set-up below is for the first of these two option, without frigates.

Commanders and Organisation

The scenarios involve few squadrons, so it is unnecessary to detail the commanders' capabilities and skills. If you want to add this command element, the following is  If you want to add this command element the following is suggested, based on Nic Skinner’s, “I wish to amuse the fleet with a signal.”
Captain Sir Richard Strachan, ............ Intrepid Admiral
Rear Admiral Dumanoir le Pelley,.....  Patriotic
The French are organised as one squadron and the British into two groups. The main squadron and the Namur as a single ship command.

The Ships

I utilised Brian Weathersby’s “Messing Around with Boats” extension with some of the Fires as She Bears Trafalgar pack suggestions to model the ships for this action. All the British crew are classed as Jolly Jack Tars with their morale status being determined randomly.

The British Ships of the Line.

Name

Rate

Damage Points

Gun Dice

Speed

Notes

Caesar

Large 3

88

10

12

Flag Ship

Hero

3

70

9

12

Carronades

Courageux

3

74

9

12

French Prize ship.

Namur

3

70

9

11

Foul Bottomed


The French Fleet

Name

Rate

Damage Points

Gun Dice

Speed

Notes

Formidable

Large 3

95

9

12

Reduce damage Pts by 1d10+3 to reflect the damage taken at Trafalgar. Broadside reduced to 9 dice.

Mount Blanc

3

 82

 10

 12


Duguay Trouin

3

 82

 10

 12


Scipion

3

 82

 10

 12

But reduced by earlier frigate action. See below.


Notes on French Ships

All crew are Sans Cullottes with their with their morale status being determined randomly.

The Formidable
The Formidable was a large 80-gun third-rate, somewhat reduced in offensive capability due to damage taken during the Battle of Trafalgar. She had lost fifteen of her 12-pounders. This damage had been reflected in her Hull and Broadside ratings, by a dice roll and a reduced firepower.

Scipion
In this non-frigate scenario, the British may fire three unmodified broadsides, Long, Medium and Short, at Scipion prior to start of battle. This represents the duel between the British frigates Santa-Margarita and Phoenix prior to the main action. The three broadsides occurred an extreme, long, and close range. Critical damage caused by these broadsides is applied to the Scipion. If this option is used the British frigates play no part in the subsequent game.

Set Up

The action took place in November off the coast of Spain in the Bay of Biscay. A stretch of sea noted for its fiercest weather conditions. Therefore, the Wind Change and the Choppy Waters rules should be used.
The initial Wind direction given in Strachan’s report is in the south-east. Therefore, the British Ships have the Wind on the Quarter and the French Wind on the Bow. 

The British have the initiative, and the Sea Conditions were normal when the main action commenced.  

Deployment

The Namur

The Namur dragged some miles behind the British formation when the action commenced. To show this, the Namur will not appear before Turn 4. In this turn, throw 1d6

  1. Turn 4 if a 6 is thrown the Namur enters the table at the same point as the main squadron started the game and on the same heading.
  2. Turn 5 The Namur enters the game on 3, 4, 5, and 6, as described above.
  3. Turn 6 The Manor enters as described above.

On entering, add a Namur chit or card to the game sequence.

The Reenactment

The game that followed from this set-up can be found here.

Workbench 2025

Well, it is time for my self-indulgent post, where I quickly review my activities this year and look forward to the forthcoming year with it...