Friday, 24 June 2022

Strength & Honour

Strength and Honour is a new set of ancient battles written by Mark Backhouse and published by the Two Fat Lardies' Reisswitz Press. The rules recreate the battles from the Late Republic to Early Empire, i.e., from the Marian reforms 105BC to about 200AD. In this era, the protagonists fielded massive armies, 20,000 men a side was not unusual. Therefore, while the rules are scale agnostic, they are aimed at a 2mm scale where a base represents a whole Roman legion, some 4,000 to 6,000 men. Conversely, a Celtic or German Warband could account for 8,000 warriors. Using this small scale, the player might lose the majesty of a painted cohort on the march but gains a virtually stunning battlefield.

Strength & Honour Rules Cover


Army Lists

The army lists provided not only cover Rome, Gauls and German, but lists are also provided for the Numidians, Spanish, Ancient Britons and the armies of Mithridates. These lists give the gamer a wide range of tactical approaches to the period's warfare. The Mithridatic phalanx in 2mm looks particularly stunning, so I am hoping for a supplement to cover the Early Republic and the Successor States. Mark has also provided scenarios for ten historical battles, including Chaeronea (86BC), Bagradas River (49BC), Watling Street (60/61AD), and 2nd Cremona (69AD) during the civil wars that brought Vespasian to power. Other battles can be found on the Facebook page dedicated to the rules.

Most of these scenarios involved 6 Roman legions and a slightly larger number of war bands. This means the painting requirement is small, and the cost of entry is low. Reisswitz has produced paper armies that can be stuck to the bases for those who want to play immediately so they are ready for battle.

The Rules

I will not provide a detailed games review, but four mechanisms give this rule a unique feel.

  1. Grid movement coupled with some randomness to the distance covered makes movement easy but keeps a level of uncertainty. 
  2. The idea of a reversal of futures when a command action fails, and the initiative passes to the opponent. This makes the length of a turn variable, something found in other Fat Lardies games and makes the commander plan carefully the order he moves his troops. The mechanism reflects, IMO, that manoeuvring huge blocks of men around with only the use of messengers and signals is fraught with difficulty.
  3. The Command Board is another device that sets the game apart. This board reflects the general’s influence over the battle. The number of tokens available is based on the army, the general and by Consulting the Auguries, the random element. The tokens, some great-looking coins available from Warbases, are then placed on the Command Board, reflecting the general's strategy. Playing these tokens allows the general to influence manoeuvre, attack, defence or rally his men. However, these valuable resources must be used carefully, as I found to my cost.The last game mechanic is the Setback and Disaster cards. These cards are printed with a number on their reverse that remains hidden. A setback in the battle leads to the player drawing a card which remains invisible to both sides. When the general thinks his opponent has passed his breakpoint, he declares ‘Homunculus Est’. The cards are then revealed and counted. If the cards exceed the breakpoint, the battle is lost. However, if the commander has called too earlier, the surviving player can discard a card.

My First Battle

My starter game was the Cicilian Gates (39BC), a small action during the Caesar and Pompey Civil Wars. Wikipedia provides a summary of the historical battle - Battle_of_the_Cilician_Gates. The sides are relatively small for Strength & Honour, two legions aside with supporting skirmishers and cavalry.


The Cicilian Gates


The Parthians/Pompeians had the advantage in cavalry, plenty of light horses and the dreaded cataphracts, but their infantry needed to be more experienced than the Caesarians. For me, the troop types set the strategy. The Pompeian light horse would harass the Caesarian wings while the centre held its position. The aim was to weaken the flanks making Bassus’s (the Caesarian commander) legions vulnerable on the flank. The Ceasarians had two options: to remain on the high ground and draw the Parthians and Pompeians to their defensive position or smash through the enemy’s centre. I went for the latter because of the threat of the light horse in trying to maintain this static position, and it seemed more Roman.

The battle started well for the Romans. After consulting the auguries, they rolled double six, which gave them an impressive Command Board that could maintain their attacking strategy.
The battle started with the light horse moving forward as the Caesarian legions moved down the hill. Skirmishers and the Parthian light horse exchanged fire on the right, with the skirmishers getting the better of the Parthians. Some terrible dice rolls here. On the left wing, the Parthians were more successful, as the Caesarian horse were harassed with bow fire but too scared to move forward because of the threat of the cataphracts.

The Pompeian's legions decided to hold their position across the road a let the cavalry for their job. The Parthian light horse on the right continued to be unlucky and eventually decided to call it a day. Here was my big error. I should have used the resources on the Command board better to give the Parthian light horse more support. However, with the Parthian/Pompeian left flank collapsing, the weaker legion became fodder for the better Caesarian legions. Finally, ‘Homunculus Est’ was called, and what remained of the Parthian/Pompeians fled.


An enjoyable game.


Battle of Vosges 58BC


Since then, I have played Caesar v Ariovistus’ Germans. The game involved 6 Roman legions and eight tribal warbands, each with their supporting cavalry. This one was a close call but Caeser triumphs but only just.


Saturday, 7 May 2022

The Feud

This wargame had a long gestation period. It took three Kickstarters plus many hours of painting before I have managed to get Baron’s War to the table. Barons War is a medieval skirmish game set in the thirteenth century.  The game was initially launched on Kickstarter in 2019 with figures for the Barons revolt against King John. Since then, further Kickstaters have followed, including several campaigns. Overall, the game is well supported and has supplements for the late Saxons, Vikings, the Norman Conquest, and the Crusades in Outremer.

A range of figures is also available through Footsore Miniatures. The miniatures paint up well, but like any medieval project takes a while to paint. This is my excuse for taking nearly two years to set up a game. The good news is the game can be played with about 25 figures aside, although a more significant skirmish can be fought as your retinues grow.


Skirmish on the Evesham Road.

Like all my games, there has to be a  strong narrative, so here is the backstory to the game. One aspect of the game I like is the campaign rules allow you, the players, to generate a grievance between the two warring barons and the flashpoint that ignited the armed hostilities. My campaign is set before Magna Carta and is loosely based on the campaign supplement, The Most Ignoble Feud. Therefore, this scenario will be the first of three games in the mini-campaign.  I also plan to use this storyline to test different rules and my ideas. 


Rivals in the West Country

The period witnessed John favouring baron families from outside his English realm. One of these was  Gérard d'Athée, a trusted lieutenant of King John, who had served him in France and later as a High Sheriff in England. Gerald was joined by one of his relatives Engelard, one of the protagonists of our story, whom John had appointed High Sheriff of both Gloucestershire and Herefordshire in 1210. The rapid rise of these men caused resentment amongst the English baronage, including the de Cares, a powerful family. The father, Richard de Clare, was Earl of Hereford and his son, Gilbert, had inherited the earldom of Gloucestershire from his mother. It is Gilbert, the son, who is our other feuding baron.


de Clare Coat of Arms


Monastery at Haines

Engelard's attempt to found a monastery at Hailes, at the centre of the de Clare’s holdings, sparked our fictional feud. Gilbert considered this one transgression too far and decided to ambush Engeland and his monks on the way to Hailes on the Evesham road.


Evesham Road


The Ambush

In preparation for his attack, Gilbert had blocked the road with several carts and tree trunks, forcing the battle into the narrow area between the wood to the south and the hills to the north. He hoped his superiority in mounted knights would be most effective in this narrow killing ground. On hearing from his scouts that the road was blocked, Engelard deployed his experienced archers and foot sergeants on either side of the road to try to turn the barricade. His smaller mounted contingent would be used to exploit any weakness.

At first, Engelard's plan bore fruit; his archers, supported by some militant monks, pushed Gilbert's crossbowmen back from the small farm and started to move into the forest. If they could expel the de Clare's crossbowmen, they could be able to shoot onto the flanks of men manning the barricade. Englelard's men had yet to make progress on the road but had pinned down the rest of Gilbert's infantry. At this point, Englelard decided to commit himself and his mount troops to attack the open land between the road and the hilly area. This was the moment Gilbert had been waiting for, and he committed his mounted knight. The knight quickly crushed Engelard's mounted sergeants and attacked Englelard and his knightly bodyguard. Outnumbered and taking casualties, Engelard fled to seek his revenge on another day.


De Clare's Knight await their moment

De Clare attacks


The Rules and the Game

Overall, I liked the rules, and I thought I had a great feel and produced an exciting weekend game. My one criticism is that I found the rules difficult to reference, despite QRS (Quick Reference Sheet), but this is probably true of any new set of rules. I plan to continue Engelard's and Gilbert's feud with a significant battle when Englelard seeks revenge for the dishonour inflicted on the Evesham road. However, the next episode will be played with Lion Rampart rules, so I can compare. 


The Story Continues

The story of Engelard's and Gibert's feud continues here.


Links

Warhost is the home of Baron's Warand includes articles and a retinue builder.

Barons War Facebook Group. A discussion group with many great photos for inspiration, army lists and downloads.

Blood Cries Afar, well research but readable book on the 1st Barons War. Great for inspiration and ideas.

Tuesday, 8 June 2021

Battle of Landon Gate

This wargame is the first action of the Ancestors' Wars—a struggle between a High Medieval army and an undead warlord and his minions. It is the second strand of my Fantastic Battle campaign world.  I wanted to try a battle between two uneven armies in this scenario and based it on Charles Grant’s Programmed Scenarios, the 'Hasty Blocking Position'. The medieval army’s objective was to hold and occupy a pass until news arrived that the main army had assembled. The former had 750 points, and the attacking undead horde 1250 points.

Scenario Rules

The rules were kept the same, but I gave both armies three turns to deploy. After that, a further six rounds would be played, plus a random element. This was achieved by a simple roll of d6 with odds, improving one pip each turn. This represented a messenger arriving with the news that the main army had assembled and was on the march.


Background

What do you do when the pretender to the throne is your long-dead great, great uncle, Roboant the Damned? This was the problem that faced Tancred III Montduras when he heard of the uprising. His response was to call the kingdom to arms. However, this would take time. Therefore, on a windy spring morning, a messenger was dispatched to Gontier, Lord of Aire and Marshal of the Foremark. The king's instructions were simple, delay Roboant’s host by holding the Landdon Gate as long as possible.

The Strategies

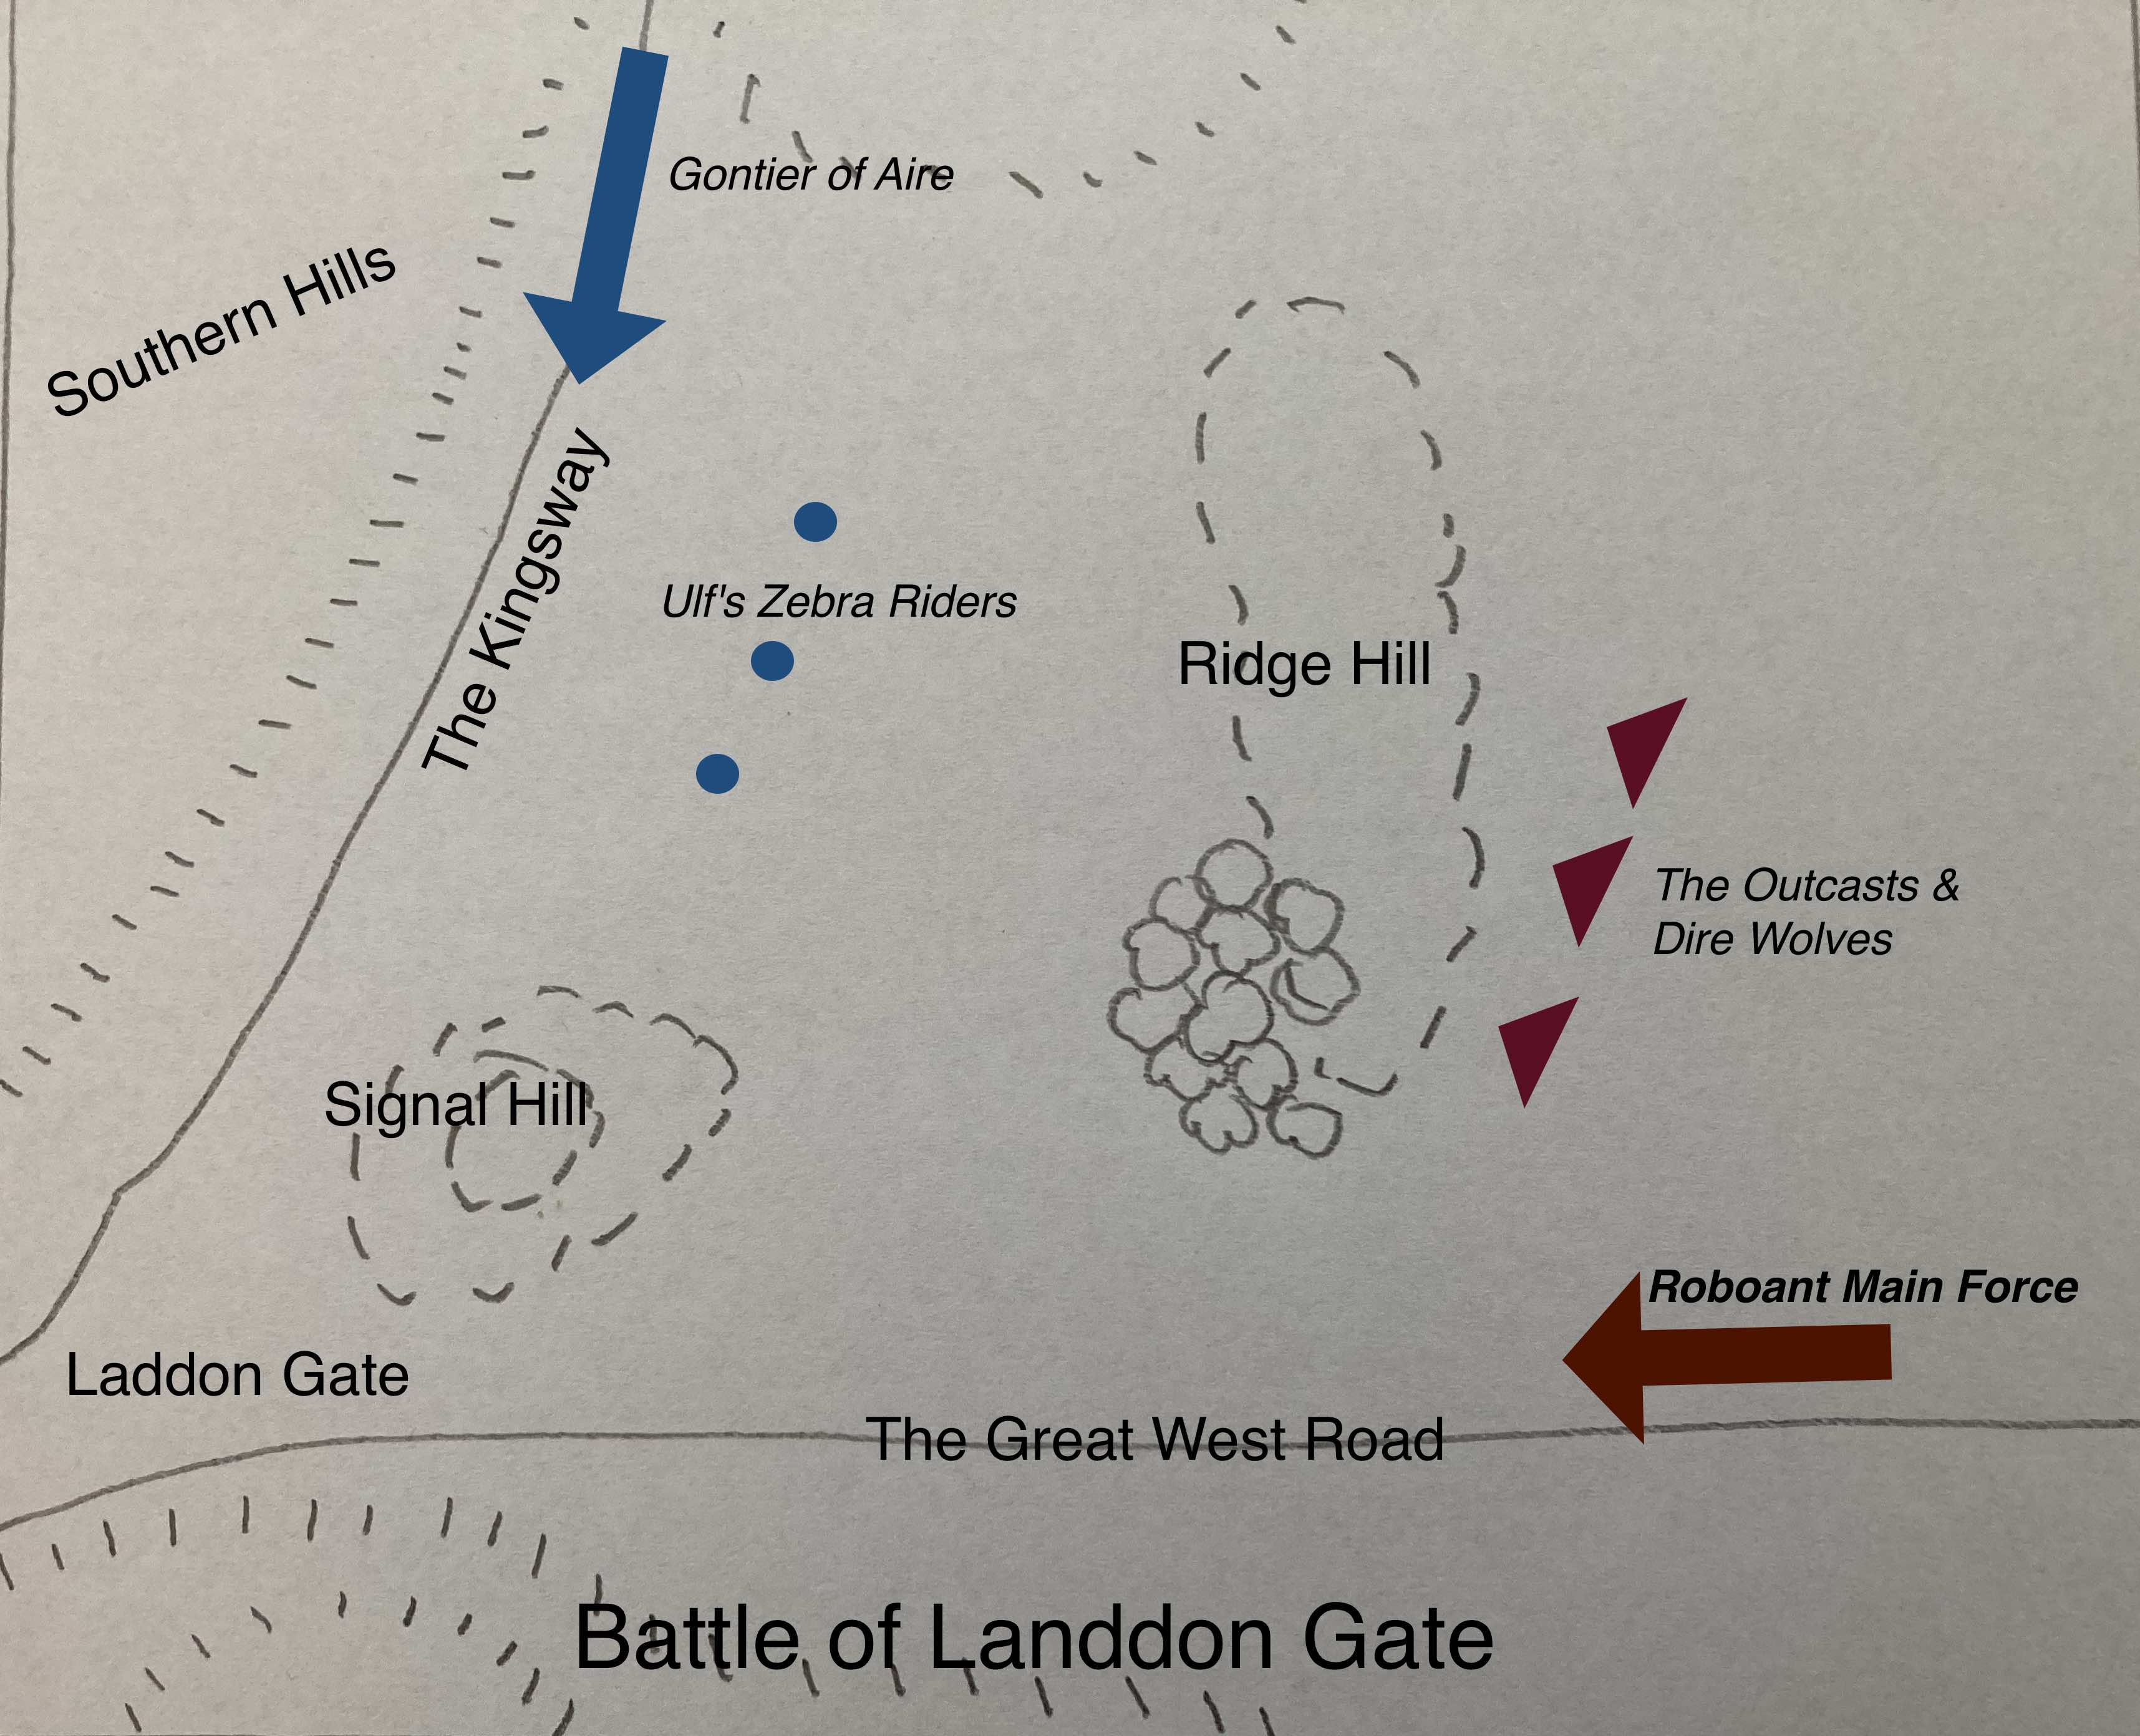
Roboant strategy was to send the third of his army to harry Gontier's army as it tried to deploy in the Gate. The bulk of his host would push down the southern road and break through the pass as quickly as possible.
Gontier's approach was to secure the pass, using Ulf's mercenary Kerradian light horse (Zebra Riders) as a defensive shield to protect his deployment of the vulnerable infantry. Once the defensive lines had been established around Signal Hill, he would make intermittent forays to disrupt the advance.


The Battle Plan


The Forces Arrival

Dawn brought the howling of wolves with it, and as the morning mists lifted in the east, shadowy figures could be seen in the distance. A pack of fast-moving dire wolves sped down the valley. Meanwhile, Gontier had sent the mercenary Ulf and his Kerradian light horse to cover the deployment at the Landon Gate.

Deployment Issues

Both commanders needed help moving their armies whilst changing from column to line. Although frustrating, this was an exciting part of the battle. The commanders were forced to move up a down the marching columns to keep units in command. A halted unit quickly caused a roadblock bringing chaos. This was a significant disadvantage to the undead army because it was more extensive, and the mindless trait slowed it. Roboant would spend the whole battle flying up and down the line trying to get his zombies and skeletons into the action.

The Advance

The problems with deployment led to the advance guards fighting largely unsupported (turn 3). The wolves had moved quickly through the woods and down the road and charged Ulf's screening force (turn 4). The developed melees saw the wolves slaughtered, thanks to some appalling dice rolls that led to a surrounding victory for Ulf and his riders.


Ulf's Screaming Force


Roboant's Dilemma

Roboant's slow-moving reanimated horde took too long to march to the pass. Haste spells helped, but there was a need for more necromancers. It was a mistake only to include one additional magic user—a note to other potential undead commanders. Summons spells may look attractive, but haste is vital to get your undead army into battle. The impact was that Roboant human allies, the Doomed Ones and the Outcast, separated from the main command structures. For a few vital turns, the attack depended on the role of the Impetuous Actions table because the Undead commanders were too busy throwing haste spells at the slow-moving column.


Robot on Giant Bat Mount


Main Attack

Finally, Roboant was able to launch his main assault. The Doomed Ones and the Disinherited (Undead Knights), supported by the remnants of the dire wolves, attacked Gontier's main body of knights. West of the Gate, in the centre of the battlefield, Ulf attempted to rally his riders. Meanwhile, Gontier's knightly rear-guard tried to prevent Skeleton horsemen from attacking the rear of the infantry column.


The Gods

Nine turns had now been played, and the game moved on to its random element. Throughout the game, the dice favoured Gontier. However, now the gods' will seem to move against him, and the die roll allowing him to withdraw never occurred. The knights faltered despite the freshly rallied sergeants (light horse) support. The zombie hordes and the Outcast brigands had entered the neck of the Gate. Gontier joined the lines of the militia spearmen as the zombie hordes stumbled into charge range. Now it seemed time was against the living, and the undead would push into the heartlands of the kingdom before the army was assembled.

The Miracle of St Emidius 

As the zombies moved in for the kill, the men started to shout, and on the southern hilltop, witnesses claimed they could see a ghostly white figure mounted on a white horse. At this moment, the earth began to rumble and shake (a random event- Earth-shaker), and standing became an effort. The two lines froze in position, unable to move forward due to the moving ground. A few arrows were let loose, but with an unstable footing, they had little effect. No one can say how long the battle halted, but it created vital minutes for the living.

The Battle Ends

The fighting continued after the earth shook, but on the next turn, a messenger arrived, and Gontier started to full-back along the pass. Roboant halted his advance, unwilling to be lured into a potential ambush. Also, the sun was now high in the sky, which was not a particularly good time for an army that liked the shadows.


Cynoscephalae - The Battle

Following on from the set-up post , here's how the refight actually played out, using To the Strongest rules in my second Phalanx versus...