Saturday, 31 May 2025

Pynda 168 BC- Part 2- The Battle

In 168 BC, the Battle of Pydna marked a pivotal moment in the Roman Republic's conflict with the formidable Kingdom of Macedon. In a previous blog, I explained the preparation, research, and several potential 'What Ifs. The one played in this simulation was where the terrain favoured the Phalanx, with less broken ground.

The Historical Battle 

Had the following phases.


  • Skirmish triggers deployment
  • Initial clash - Phalanx gains advantage on flat ground
  • Terrain disruption - As Phalanx pushes the Romans back, their formation gets disrupted.
  • Roman exploitation - Manipular flexibility exploits gaps
  • Macedonian collapse - Battle line collapses
  • Rout


My Simulation

The Reluctant Advance

As the first light of dawn broke over the battlefield, two foraging parties clashed near the dry river bed. A brief skirmish ensued, during which the Roman light infantry was victorious, causing their Macedonian opponents to retreat in rout. This initial success would cause Aemilius Paulus a problem because the light infantry started to loot the bodies of their victims rather than retire to safety.


Whilst the skirmishes were fought, the two armies took cautious steps forward to support their companions. King Perseus of Macedon felt a heavy burden of uncertainty weigh upon him, causing him to hesitate. This reluctance fragmented his formation, with the Phalanx's left and centre surging ahead, leaving him and the right wing lagging behind. Seizing the moment, Aemilius Paulus moved his Legion forward, supported by the elephants on their right.


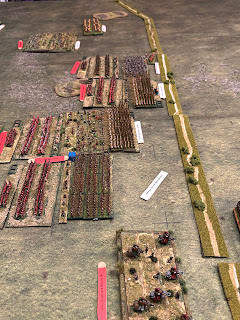
The Phalanx and Legions Advance

The Phanlanx and the Legions Advance

A Battle of Attrition

As the Phalanx rolled forward like a tide, Perseus finally regained control over his battleline, guiding them across the dry streambed in a solid line. Meanwhile, Aemilius Paulus faced significant setbacks. His advance was stifled by the remnants of the victorious light infantry, who seemed utterly absorbed in looting the fallen Macedonian soldiers rather than providing vital support to their comrades.
On the Roman right flank, colossal war elephants struggled against the uneven ground, their lumbering frames hindering the cohesion of Paullus' force and splintering any chance of an effective attack. In the ensuing chaos, Roman cavalry engaged in fierce skirmishes, pushing the Thracians back but inadvertently distancing themselves from the main body of their army. The Roman line had started to fragment.

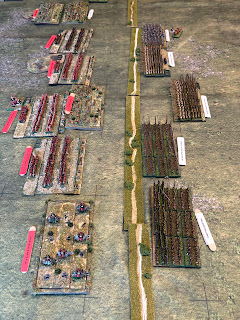
The Legions are Pushed Backwards
The Phalanx pushes the Legion backwards. In the Middle of the line, the Roman Light Infantry 
Remained trapped between the two masses.


Impetuous Cavalry?

In a mirror image of the Roman troubles, the Macedonian right flank saw Perseus' heavy cavalry chase off the Numidians, only to find themselves unable to rein in the wild pursuit, creating a precarious imbalance as zeal surged within their ranks.

Collision of Forces

The moment of reckoning arrived with a visceral clash; the two armies collided. The disciplined Macedonian Phalanx drove forward, initially gaining the upper hand and forcing the Roman legions uphill onto the rocky, unforgiving terrain. Yet the Roman velites proved to be an insufferable thorn in the side of their advance, thwarting their every move and creating chaotic gaps in the Macedonian centre.
Perseus found himself grappling with a dual challenge as his victorious cavalry struggled to regain control, unable to shift their focus back to launch an attack on the Roman left flank and rear, while the battle line fragmented, leaving the Macedonians more vulnerable than the Romans to exploitation.


The Turning Point

As the sun began to dip low in the sky, the tide of Battle seemed to sway precariously. The Galician mercenaries, once a bulwark for the Macedonian side, turned tail under pressure from the relentless Ligurians, further unravelling the Macedonian lines. The momentum shifted as the Roman forces finally orchestrated their regrouping, turning the tide against the Macedonian onslaught, albeit with their cavalry still isolated from the main action.
The heart of the battlefield, the decisive ground where fate would be determined, pulsated with tension as both sides prepared for what could prove to be the calamitous conclusion to this struggle.


The Final Push

In a dramatic turn of events that seemed ripped from the pages of Hollywood, the Macedonian cavalry commander brought his men's battle lust under control and managed to re-enter the fray, charging fiercely into the flank of Paullus' Legion. Recognising the urgency of the moment, Paullus committed his triarii to the Battle, and while the Roman Legion held firm, they became disordered under the double Macedonian assault.
Now victory appeared to hang tantalisingly within Perseus' grasp, he called out "Homunculus Est," urging his troops to claim victory. Success, the might of the Republic had broken.


A Close Call

History would remember Perseus' victory as a close escape. Had the Romans made the call at the end of the previous turn, they would have seized a stunning triumph. Overall, the Battle was a hard-fought contest, where both sides emerged battered but unbroken. Unlike the historical engagement, the 3rd Macedonian War would not end in a Pynda. Rome would seek revenge, while Perseus might have released the purse strings to purchase more mercenaries.

The Final Moves. The Cavalry Returns
The Final Moves. The fighting has broken into clumps, but at the top of the picture,
the Macedonian Cavalry has turned to attack the Roman Flank

Some Thoughts

Despite the outcome, the Battle followed the historical sequence of events closely. Besides some bad dice throws, the omens favoured Macedon. 
  1. The Roman light infantry's early success was a curse to Paulus. A series of poor dice rolls meant they hindered the Legion's advance. In the end, Paulus sacrificed them so he could get his legions into action, although the delay was probably costly. The opening light infantry should occur on one of the flanks rather than the centre of the battlefield. 
  2. The Macedonian cavalry played a more prominent role, fulfilling its intended purpose in Successor armies. In the historical Battle, they are invisible, and the sources do not answer why they did not play a prominent part.
  3. Last, the reduction in broken ground allowed Perseus to keep the Phalanx together, even when pushbacks fragmented the line. The fewer gaps were never sufficient to permit the Romans to exploit their flexibility. 

Pynda 168 BC - Part 1. Set-Up.

Strength & Honour's first supplement covers the period from Alexander the Great's conquests to Rome's defeat of Hannibal and the Successors' Kingdoms. It was one of my favourite periods, so unsurprisingly, I already owned a small mountain of 6mm miniatures that could be used to recreate these conflicts. I decided to replay the last scenario in Mark Backhouse's supplement, the Battle of Pynda, 168 BC, which marks the climax of the Third Macedonian War, where Rome's victory led to the demise of the Macedonian (Antigonid) kingdom.


Pynda - The Challenges.

  1. How to rebase my 6mm figures, which were based on the traditional DBA style, with 40mm x 20mm rectangular bases. 
  2. Strength and Honour work well solo, but I wanted to strengthen the uncertainty. This problem is more acute for solo wargamers when they attempt to refight a historical encounter. Therefore, I produce several What-If changes to the standard battle layout.

Rebasing

I wanted to obtain the impression of very different mass formations moving across the battlefield, a distinct advantage of using the 2mm scale. To replicate this in 6mm, I used three basing options.

1. Phalanxes and Legions. I used the standard 120mm x 60mm bases for these formations. The photo below shows the mass phalanx formation, which creates the right impression. The Roman manipular legion proved a more complex subject. Initially, I  covered it with a small block of figure offset to give the chequered board effect. However, this solution lost the impression of mass. Therefore, as suggested in the supplement, I opted for two ranks of miniatures with the triarii and velites mounted on separate bases. This is the version I adopted, but I am still looking for a better solution.

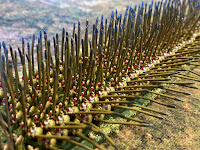
The Phalanx and the Legions on a Single Base
2. Warbands, Spears, and Light Cavalry. I left these on their original 40x20mm bases that would be slotted into a sabot base. The one addition I made was creating several blank, textured bases to add to the sabot base, producing a more significant variation of formations.
Numidian Cavalry with Extra Slot in Bases
3. Skirmishes and Elephants. I mounted these on 120x20mm bases. Therefore, they could be used as a single unit and in three skirmish formations. They could also be placed as the forward bases in a warband or other formed unit to reflect some loose troops. This was useful in representing the theurophori unit, which fought in skirmishes and tighter formations.

A Typical Successor Formation with a mixture of bases

Overall, except for the legions, I am pleased with the result.

Battle Set-Up.

Like most ancient battles, we are dealing with the best guesses for both the battlefield site and the troops involved. Overall, 

  • Ancient sources like Livy and Plutarch focus on the morality and tactics of the commanders (Perseus' cowardice, Roman adaptability).
  • Modern scholars reframe the battle in terms of terrain, timing, and logistics, demonstrating how chance and topography created the opportunity for the Romans. Rather than a simple morality tale, modern reconstructions present Pydna as a chaotic, hastily joined battle in which small battlefield features had outsized impacts. 

In the end, I opted for a dry river bed that crossed the battlefield, with the land gradually rising on the Roman side. As mentioned in the Strength & Honour supplement, the dry river bed did not play a significant role in the battle. More critical was the broken ground that disrupted the phalanx's advance. Most of this fractured ground was placed on the Roman side of the river, to reflect that the phalanxes only struggled with their formations once they had started to push the legion back.

What IFs

The discussions on Pydna centre around the Roman legion's mastery of the phalanx, the importance of their broken ground in the Roman victory, and Perseus' poor leadership. This led to six what if scenario changes. Throw 1d6
  1. Perseus was notoriously frugal with his treasury, and the sources suggest that he had the opportunity to recruit more Galician mercenaries; therefore, consider adding another warband or cavalry unit to the Macedonians.
  2. It is alleged that Perseus was ill, had poor command ability, or was a coward and played little part in the battle. To reflect this interpretation, the Macedonians cannot use the Command Board for 1d6 rounds. An alternative mechanism is that each round, the Macedonian side rolls 1d6; if the result is 1, the command board can not be used for that turn.
  3. The broken ground was more important than the legion's superiority over the phalanx. Remove 1d6 pieces of open ground to open up the battlefield. This option could also test Perseus's ability to remain on the defensive ground.
  4. The ancient sources emphasise Aemilius Paulus' augury skills and their impact on Roman morale. The add +2 to 'Consulting the Auguries.
  5. The battle was a meeting engagement, and the Macedonian phalanx had difficulty deploying its ranks. Remove the light infantry skirmish (it has already occurred), and the Romans gain a free first move; then the initiative is decided as normal.
  6. Macedonian cavalry is fartigued to simulate the friction between Perseus and his nobles.
My battle replay followed What-If 3, with less broken ground. The battle report is here.


Some Reading

The main primary sources are Livy XLIV, 40-2 and Plutarch Aemilius, 16-22. Both are derived from Polybius, but Plutarch refers to an eyewitness testimony of Scipio Nasica and a contemporary historian, Posidonius. The ancient sources focus on the morality and tactics of the commanders (Perseus' cowardice), and Roman adaptability.
 
Modern scholars, see below reframe the battle through terrain, timing, and logistics, showing how chance and topography created the Rome' victory.

Backhouse, M., (2022), Strength & Honour: Wargaming Rules for Epic Battles in the Ancient World, Reisswitz Press.

Backhouse, M., (2024), Conquest, Alexander to Hannibal. A Supplement for Strength & Honour. Reisswitz Press.

Burton, P. J., (2017), Rome and the Third Macedonian War, Cambridge

Cole, M., (2018), Legion Versus Phalanx, Osprey

Head, D., ((1982), Armies of Macedonian and Punic Wars 359BC- 146BC, drawing by I, Heath,  Wargames Research Group

Johnstono, J, & Taylor, M. J.,  (2022), 'Reconstructing the Battle of Pydna', Greek, Roman and Byzantine Studies, vol. 62, 44-76

Sabin, P., (2009), Lost Battles. Reconstructing the Great Clashes of the Ancient World, Continuum


Wrightson, G., The Third Macedonian War and the Battle of Pydna, Penn & Sword.

Pynda 168 BC- Part 2- The Battle

In 168 BC, the Battle of Pydna marked a pivotal moment in the Roman Republic's conflict with the formidable Kingdom of Macedon. In a pre...